Hot Bee Smokers
Bee Smokers Seen with Thermal (Heat) Images
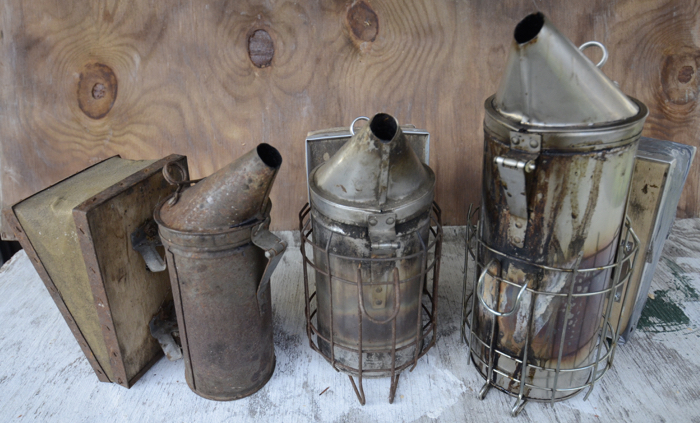
This page shows bee smokers with heat instead of visible light. With heat, we can essentially see inside a smoker while it contains a smoldering fire. One movie clip shows the fire beginning to burn inside a bee smoker. The other movie clip shows a common mistake made by new beekeepers, which is much more vivid seeing the fire inside the smoker. Before switching to the thermal images and movie clips, here are the bee smokers I will be using. They are three sizes of Dadant smokers, which are standard dependable smokers, used by thousands of beekeepers.
Also, please do not copy my pictures or movie clips as I hold the copyrights on them. Just link to this page, which will be a stable connection.
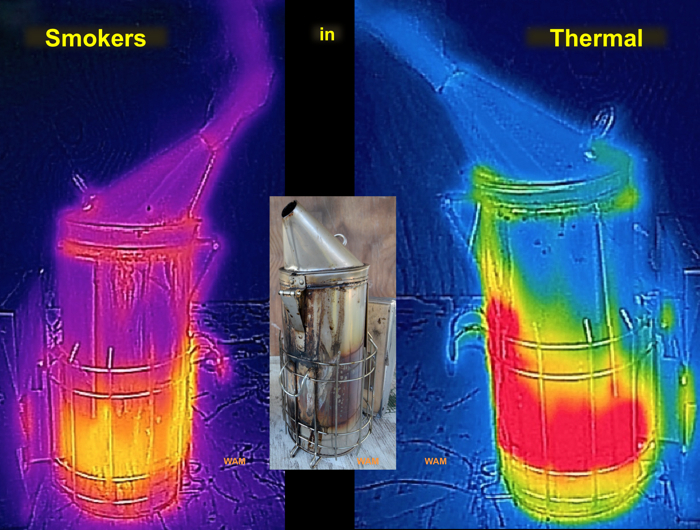
The left and right pictures below are thermal images of the large smoker ready for use. The center picture is the smoker in visible light for reference. The thermal images are in different heat scales. The left one is more artistic where brighter means hotter. The right one shows the temperatures color coded where white is the hottest (not seen here) followed by red, yellow, greenish, and blue, the coolest.
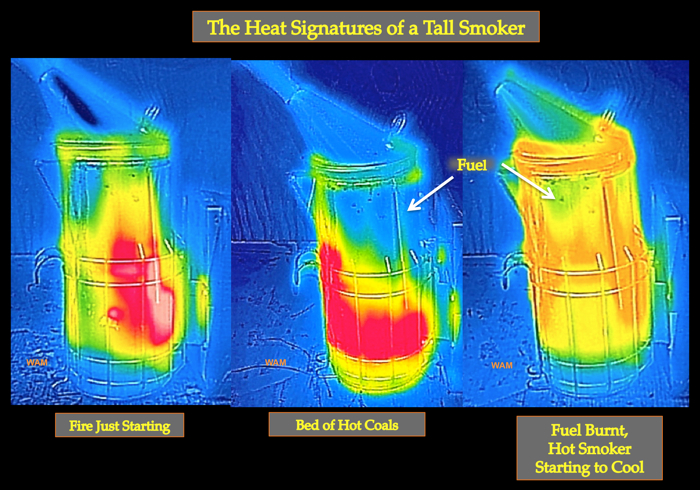
Sometimes the pattern of observed heat (called the heat signature), during start up, seemed to depend on the type of fuel and how tightly it was packed in the smoker. That might be because the type of fuel could change airflow within the fuel. Cedar chips, started with a ball of newspaper, naturally pack closer compared to pine needles, allowing more airflow. Below are three thermal images showing the “stages” of fire when starting a smoker with a small ball of newspaper and cedar chips (the kind bought for dog kennels). The fire began from where the air blasts in from the bellows. Once the red coals covered the bottom of the smoker, it was ready. The third image shows the smoker uniformly hot and cooling down because its fuel was gone.
Using a small ball of newspaper and pine needles, a different beginning heat signature occurred as shown in the image below. A white hot spot formed on the side of the smoker can opposite the bellows.
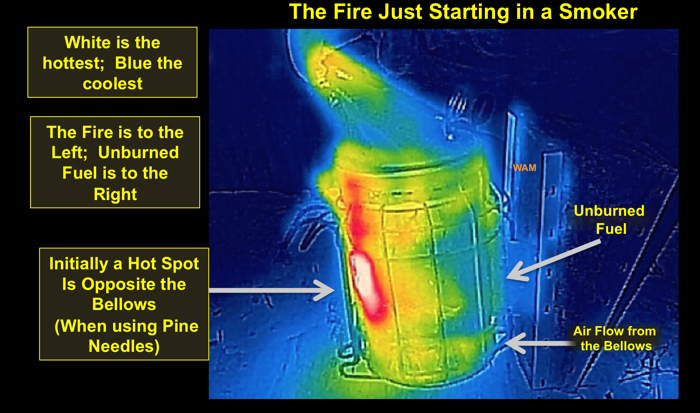
While I light a smoker using newpaper and pine needles, watch for the white hot spot forming on the side of the smoker can opposite the bellows. That white hot spot location was quite consistent when using pine needles. I was going to do a voice over narration, but for the first thermal movie clip, just watch the heat colors appear and change.
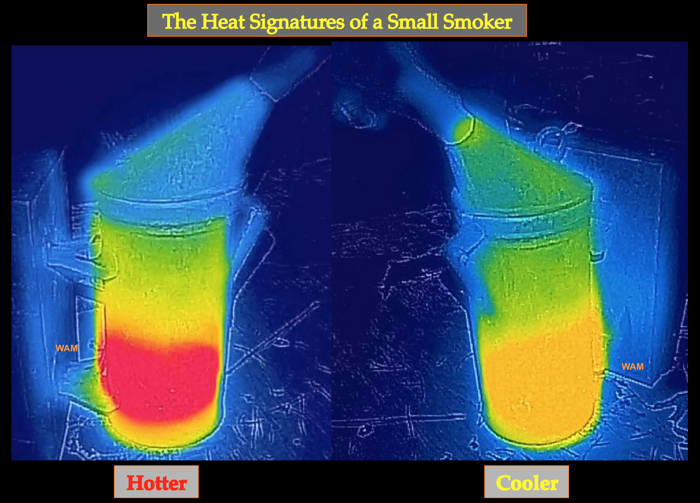
Smaller smokers are generally more difficult to light and to keep lit with their reduced volumes for the fire. Below are two heat signatures of the small smokers. In the left image, the smoker was red with hot coals and was ready for the bees. In the right image, the smoker was cooling down. Even when using pine needles for fuel, I did not get the white hot spot opposite the bellows. Perhaps the smoker was too small.
When trying to light a smoker for the first time, it’s tempting to load the fuel first. After all, the fire needs something to burn. But my rule is the fire goes in the smoker first. Then quickly add the fuel over the fire. Be careful not to smother the fire by packing too much fuel on the fire. In the movie clip below, I demonstrate the mistake of putting the fuel in first. That forces the fire placement at the top of the smoker, over its fuel. It’s not natural for a fire to burn down when its heat rises. Also the fire must burn down against the air from the bellows coming up. Remember this movie clip demonstrates a mistake.
You can support this work by purchasing a copy of my book at
book-ordering page. To get to that page quickly, click on the book picture below.
Consider supporting these pages by making a donation. Click the donation button below and enter credit card or debit card information. Paypal handles all the security. Thank you.
W. A. Mangum, PhD