Screen Floor Top Bar Hives
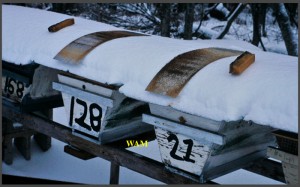
Checking “sticky boards” (the metal sheets laying on the hives) in 100 screen floor top-bar hives. I remove the sticky board from the back of the hive. The trash tells some colony conditions – even in the dead of winter.
100 Screen Floor Top-Bar Hives: Introduction
In my top-bar hive book, I give detailed instructions for building hives with either wood or screen floors. This page and all the pictures below are a supplement to the book on screen floor top-bar hives. I wrote this page to be read carefully like a chapter in a book. Success or failure in beekeeping is built upon knowing the details. So you will find that my information is rich in details, both in words and in pictures.
I usually like to keep about a dozen top-bar hives on screen floors. Then that changed. For about five years I conducted an intensive research project on varroa mite population growth. I also documented miticide-resistant varroa mites occurring in my apiaries. (Technically speaking, they were resistant to tau-fluvalinate the active ingredient in Apistan.) For that project, I managed 100 screen floor top-bar hive colonies. With all those hives, I counted over 400,000 varroa mites on my “slide out” sticky boards right in my research apiaries using a little hand counter. Needless to say from working all those screen-floor hives (in four apiaries), and nearly living with my bees for four summers, I accumulated a wealth of technical screen hive experience combined with 40 some years of bee biology experience, which I shared in my top-bar hive book and here.
Here is some background on screen floor hives for readers who have not yet seen the material in my book. The floor of a top-bar hive can be wood or screen. Unlike a tall vertical hive, all the combs of a horizontal hive, like a screen floor top-bar hive, contribute bits of trash falling from them directly on a sticky board below. As we will see, the type of trash, its location, and pattern on the sticky board, can tell things about what is going on in the colony just above.
The screen typically has eight holes per inch, the same used in a frame hive for varroa detection/monitoring. The bees cannot go through that hole size, but varroa mites can easily pass through that screen. While on the adult bees in the hive, some varroa mites fall from the bees. Over a screen floor, falling varroa mites pass through the screen and become trapped on a board below coated with a sticky material, called a sticky board. (With a wood floor hive, the fallen mite crawls on the floor until she remounts another bee, which I have seen in my top-bar observation hives.) The idea of the screen floor was that if enough varroa mites fell from the cluster, and got caught on the sticking board, then the hive design would help control the varroa population. However the consensus opinion is that not enough mites fall through the screen for it alone to control a varroa population. An Integrated Pest Management (IPM) system for varroa uses several methods to manage varroa populations at low non-damaging numbers. The beekeeper uses chemical pesticides, called miticides, as an unwanted last resort if the varroa numbers become too large (sometimes never). (I discuss this subject in detail in the book.) For example drone brood removal and using varroa resistant/tolerant bee stocks are two non-miticide IPM methods to help keep down the number of varroa. As part of an IPM system, some beekeepers still want screen floor top-bar hives because of their varroa-removing ability and other claimed benefits (ventilation, etc.).
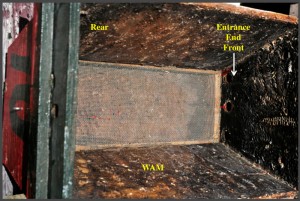
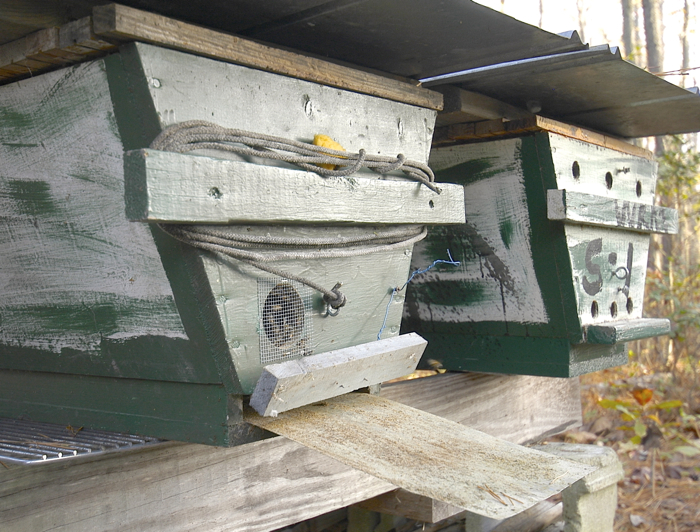
For the different styles of top-bar hives, the screen floors can be different. One style has the screen permanently exposed so the trash always falls on the ground. Another style has a wood floor hinged under the screen floor. This arrangement lets the beekeepers close the screen floor from below with the wood floor, for example in the winter. In my design (shown below), the wood floor always closes off the bottom of the hive under the screen floor. Between the screen and wood, a sticky board slides out from the back of the hive. My sticky board is an aluminum sheet coated with vegetable oil to trap the varroa. I really do not like the aluminum sheets (mainly because of the glare from the sun). Expensive conventional sticky boards were not an option because I needed 100 of them. Furthermore, since I typically counted mites from 40-50 hives in a day, I had that many sticky boards to check. Efficiency was important. After counting the mites on a sticky board, I quickly scraped it clean, applied a layer of oil, and slipped it back into the hive (see the book for details). The picture below shows a sticky board (without oil) partly withdrawn from under a hive. The little wire from the door wraps around a screw protruding from the back of the hive (above the door). The wire holds the door open while I remove and insert the sticky board, freeing up my hands.
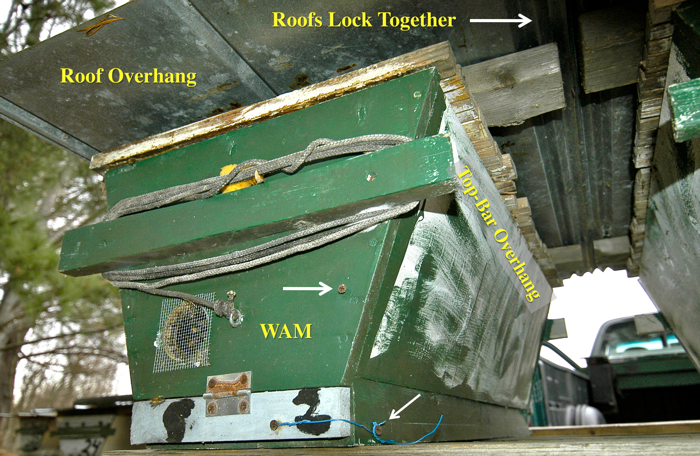
The picture below shows the door closed. Now I unhook the wire from the protruding screw above the door (indicated by the arrow above WAM) from the previous picture and run the wire around the corner and wrap it around another protruding screw on the side (indicated by the lower) arrow to keep the door snug against the hive body. I needed 100 hinges for all the doors, but lucked out and found a pile of used ones at a flea market. Notice I am using very simple but effective modifications to the top-bar hive, a core practice in designing my hive equipment. Here are some other points described in the book, but shown here nicely. This is a pair of hives in a stand. See the generous roof overhang helping to keep everything dry below. The five-groove roofing tin covers the hives. The grooves fit together as shown in the book. Notice no light shines through where the roofing tins meet, forming a leakproof roof, unless the rain is heavy because the roof is flat, and drainage is slow. To correct that, you can build the roof with a tilt, but the hive and stand must be horizontal for proper comb growth. Next, see how the top bars overhang from the side of the hive. They were not cut even with the side of the hive. The overhang lets you lift up the top bar not pinch it, which makes lifting the bar less awkward and keeping the comb vertical easier. Lifting the top bar from under the ends is a smoother more natural motion resulting in elegant and graceful comb handling, and less tiring too. In general, beware of this important fact: The styles of top-bar hives people have influences their conclusions they make about top-bar hive beekeeping, which can be misleading, though unintentional.
Originally I used a piece of sponge for the door to the sticky board compartment, a clever, inexpensive closure as seen in the picture at the top left corner of this page, where I am checking the positions of winter clusters. (The trash on the sticky board tells the cluster is just above.) The sponges are on the snow-covered hives next to the metal sheets, which I will call sticky boards. In the book, you can read why my cherished, but nosy “neighbors, even way out in secluded rural apiaries, made me switch to the wood doors.
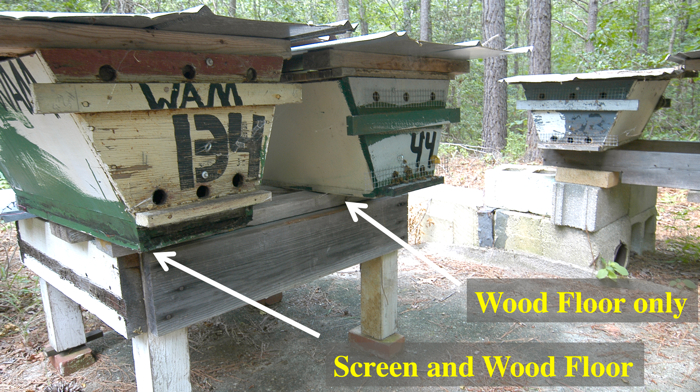
As I advised in my top-bar hive book, these screen floors do involve more maintenance to keep the compartment under the screen free of wax moths, small hive beetles, ants, etc. Some of that I show below. If you use these screens, screw the screen/wood assembly to the hive body (as advised in the book). Don’t use nails. With screws, you can easily switch from screen floors to wood floors. The advantage of this design is that they are easy to build. The screen floor hives are still easy to move too, for example to transport to farm fields for crop pollination. My apiaries have hives with screen and wood floors. Screen floor hives have have thicker bottoms to make room for the sticky board and to insert simple cleaning tools (as explained in the book). The picture below shows a screen floor hive to the left compared to a wood-floor hive to the right.
Before getting into the technical details about the screen floor top-bar hives, kindly appreciate how I came to have so many of them – 100. Who ever heard of such a thing? Beekeepers eventually get curious and ask me. So here goes. I wanted to study varroa populations with a lot of hives, instead of the much easier way of just using say 5 or fewer hives. A large number of hives gives a better understanding of the variation in the growth of these parasite populations. The number of mites in different hives can vary so much. For example, I had hives with total varroa mite populations as low as a few hundred mites (very good, possible survivor stock). A few hives away was my dubious all-time record holder, a colony with 13,501 varroa mites (a colony which unfortunately died soon afterwards). And let’s not forget to look at the bigger picture. We need scientific research conducted using top-bar hives (that is, a horizontal design) to help our community of top-bar hive beekeepers. That’s much better than making do with research recommendations from frame hives (that is, a vertical design).
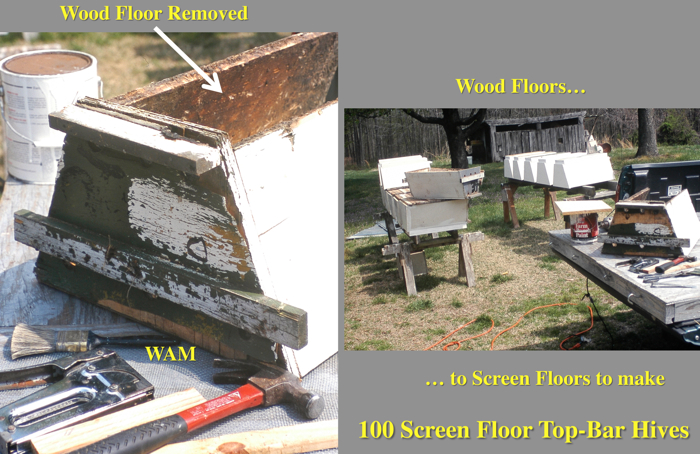
I did not build all 100 screen floor hives at once. Rather, I built up the numbers from my 200 hive pollination operation after I moved to Virginia where the demand was lower for crop pollination. The hardest part of the construction was the transfer to screen floors. Most of my pollination hives were constructed before the varroa threat. The floors were naturally wood. To make matters worse, I nailed the floors to the hive bodies (with big nails). Never did I dream a time would come when I would be prying off so many of those floors because of an – exotic – mite. Yet beekeeping sometimes calls for adaptation, and part of that is endurance. For each hive, my procedure was to remove all the combs and bees, hammer and pry off the wood floor, attach the screen floor assembly, and reinstall the bees. Do that 100 times, usually in batches of about 10 hives as shown in the pair of pictures below. On the left, I removed the wooden floor from a hive. On the right is my little assembly line, changing from wood floors to screen floors, even painting the hives white. The tailgate of my pickup truck served as a workbench since I do not have a wood shop.
Normal Trash Patterns on Sticky Boards
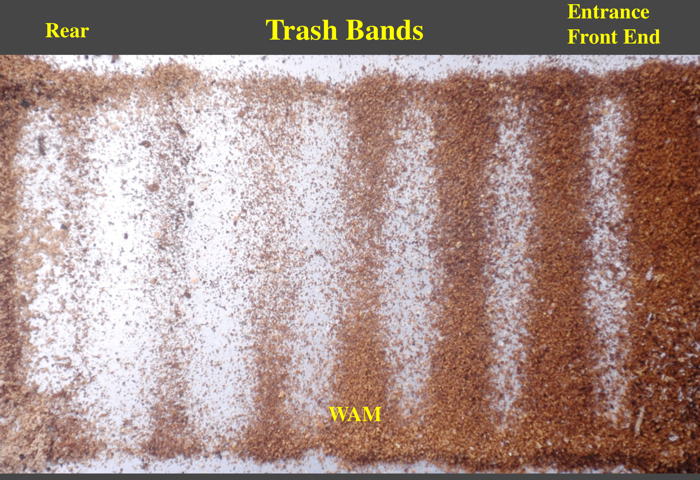
Various colony conditions can be determined from looking at the trash on a sticky board. The pattern of the trash on the sticky board is important too. To begin as shown in the book (with different pictures), the normal trash falling from between the combs accumulates in bands on the sticky board. When not counting varroa, my sticky boards do not have to be coated with oil. Sometimes I let them be “dry” just to see the type of falling trash. The picture below shows a typical trash band pattern. Knowing the normal trash pattern is important to tell when obstructions are on the screen blocking the trash as shown on this page below. (Other beekeepers may have different screen floor designs from various styles of top-bar hives. That should be ok because the trash and patterns on the various sticky boards should be similar to my photographs.)
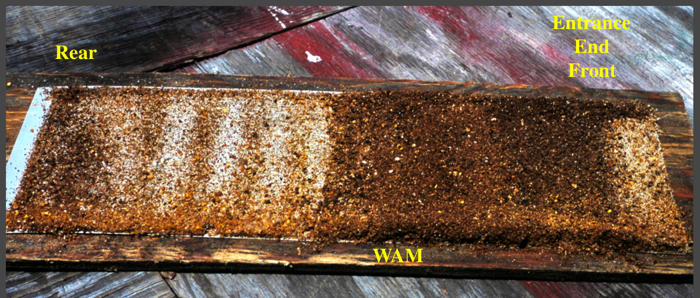
In the picture above, the right end of the board was under the brood nest. (The brood nest is next to the entrances at the end of my hive as shown in the photographs on the other pages.) More bee activity on the combs generally makes more trash falling on the sticky board from that location. Therefore, the brood nest typically has more trash below it than combs of honey. Notice the trash bands are thicker on the right, under the brood nest, than on the left, mostly under honeycombs. If the beekeeper does not periodically remove and clean the sticky board, too much trash builds up. With too much trash, the trash bands fill in and disappear as shown on the sticky board below.
Like the first board, the entrance end (front) of the hive was to the right. Note the large trash accumulation on the right, which was under the brood nest. At the far right of the sticky board, near the edge, the trash layer becomes thin. The combs there were by the entrances, out of the brood nest. Unless the hive is very crowded, bees leave these combs somewhat empty, especially on the side of the comb facing the entrances. On the left, some banding still appears in the thin trash layer. That part of the board was under mostly honeycombs, which produces less trash. Overall, this is too much trash on the board. It needs to be cleaned more often, allowing the beekeeper to see more things in the trash. (I am not sure why there is that dark trash at the very back of the hive (far left). The queen could have found an empty comb back there and made another, much smaller, brood nest. Don’t think the honeycombs in the middle of the hive always act as an “excluder.” That is a myth. In fact, with my 30 top-bar observation hives, another chapter in the book, I routinely see the queens “resting” up in the honey bands of the combs, well out of the brood area. I keep that in mind when looking for queens in the large hive.)
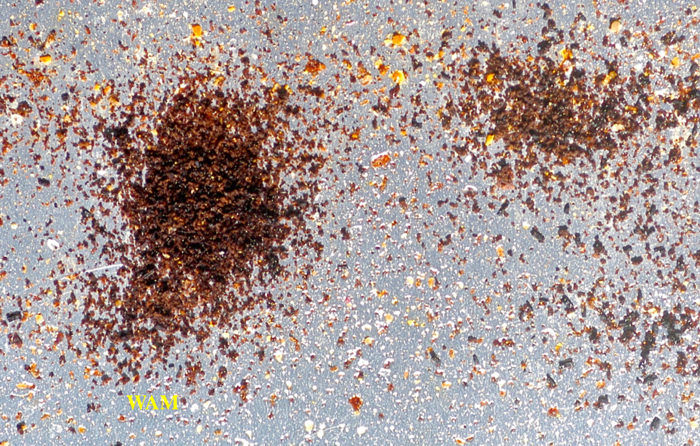
Sometimes small piles of fine chewed old wax appear on the sticky board, a pattern breaking from the typical trash bands. I see these piles more often in the summer when the bees are not in a nectar flow. The picture below shows a couple of them. The pile on the left is very obvious. On the right, that “pile” could be easily missed if more trash from other sources were present.
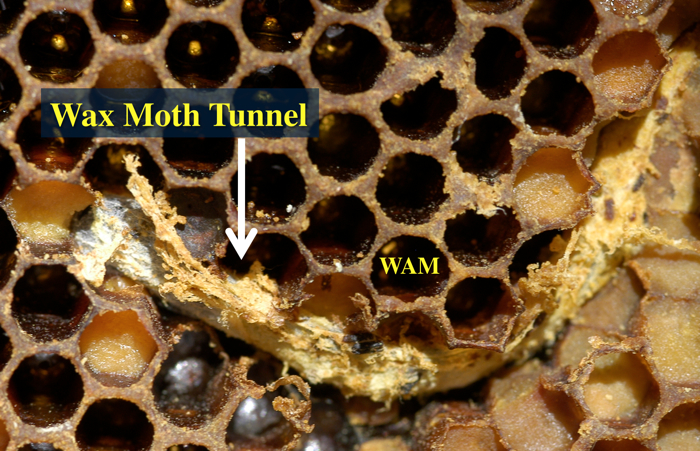
From what I have seen, the bees are chewing the comb just above the locations of the piles of wax. Why they are chewing the comb is a good question. They could be trying to remove something from the comb like a wax moth, which the larva spins, as shown below.
In a hot summer dearth when adult wax greater moths are present in an area, a colony is constantly trying to keep them out of the hive. Not only are the adult moths trying to enter the hive at night (which is why I am in my apiaries at night looking for this behavior to gauge the moth invasion pressure), but the small moth larvae are trying to infest the combs. If the bees detect the silk tubes, they chew the comb around the foreign object to remove. In the picture above, notice how the wax is not around the tube. The bees will continue gnawing the comb until they can drag off the moth’s spun tunnel, a big job for them. Sometimes a well defined pile of wax bits forms below their work site. I say sometimes because that probably depends on the height of the work site above the sticky board. If the work site is high up on the comb, then as the bits fall, they scatter, bouncing off of the bees on the comb, resulting in less of a distinct pile. If the work site is on the lower edge of the comb, the bits fall almost directly on the sticky board, forming a neat pile. So be careful with conclusions from the observations. The appearance of the piles does not always indicate wax moth larvae are infesting the combs. You can have larval infestation and no piles. On the other hand, you can have piles and no larval infestation. To stress the last point, I see these piles, and I cannot tell what originally caused the bees to chew their comb. In some situations, I have suspected the bees were removing accumulated cocoons from old brood comb.
Colony Conditions Indicated by Trash Patterns on Sticky Boards
Sometimes I can tell some conditions in the colony, by carefully “reading” the sticky board trash pattern along with identifying exactly what fell on the board. Let me stress here that looking at the sticky board does not replace a visual inspection of the colony’s brood nest (for example to check for disease and queen health) and checking the honey combs (for food storage). When properly done that inspection does not disturb the bees very much. I have opened hives and even seen virgin queens chewing holes in queen cells – stinging the pupae inside. And what about those elusive laying workers, not just the eggs, but seeing the workers backed down in the cells caught in the act of laying eggs – with the hive opened up. Both of those behaviors are incredibly easy to disturb. The top-bar hive design makes it extremely easy to inspect the colony with very little disturbance to the bees. When you find something that could kill the colony (failing queen, starvation risk), the payoff for the bees is huge. Looking at a sticky board is just a quick way to do a partial check on the colony. As besides, it’s just plain fascinating to look through a colony’s trash never knowing what you might find.
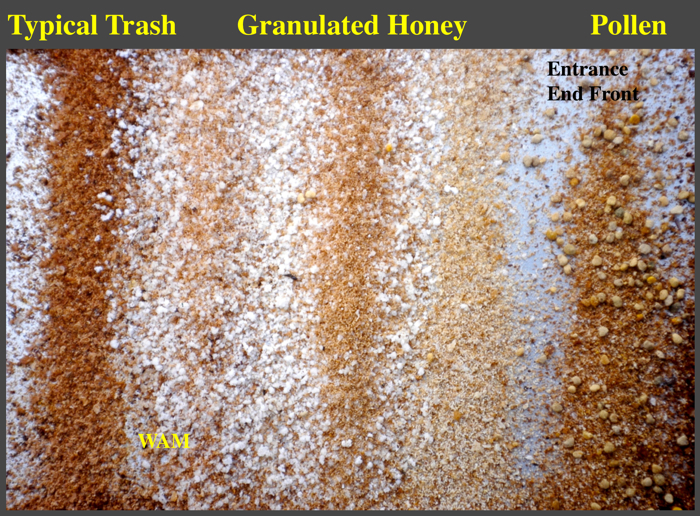
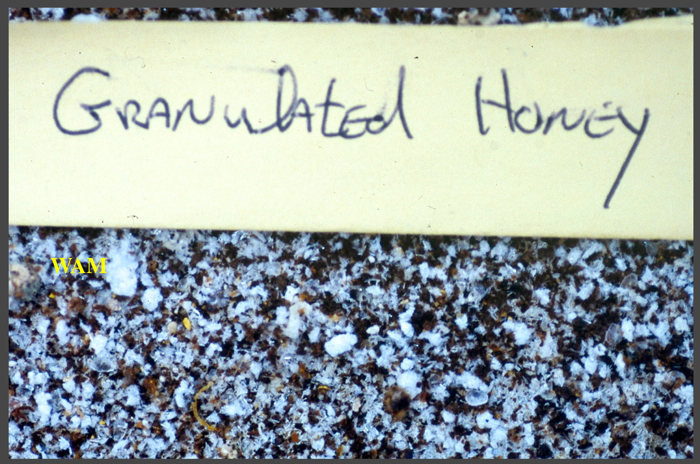
Below are some examples. In the spring, the brood nest expands. As the pollen collectors enter the hive from the entrance end, they tend to deposit their pollen in the comb in front of the brood combs. In putting the pollen pellets in the cells of that comb, some of the pellets fall. The fallen pellets sometimes form a band across the sticky board, marking the front edge of the brood nest as shown below. The entrance end of the hive is on the right of the sticky board. Below “Pollen” is scattered pollen pellets from the pollen comb, which would be above it. Going to the left, which would be under the brood nest, is a layer of white crystals. These crystals are granulated honey. The bees are expanding the brood nest into the old honey bands in the upper parts of the combs. They are cleaning out granulated honey in those combs. As the bees discard the crystals, they drop some. Granulated honey on sticky boards is not too common, but it depends on the nectar plants of the honey because they determine the kinds of sugars. I show a close up of granulated honey in the identification section below.
Over to the left is a normal trash band. This band suggests the region of granulated honey was not very large and confined to part of maybe 2 or 3 combs. Also in the granulated honey, the coarse white crystals are light-brown patches of some very fine unknown material, probably where the bees were chewing the comb. I usually see the granulated honey on the sticky boards in the spring, although other locations can of course have a different timing.
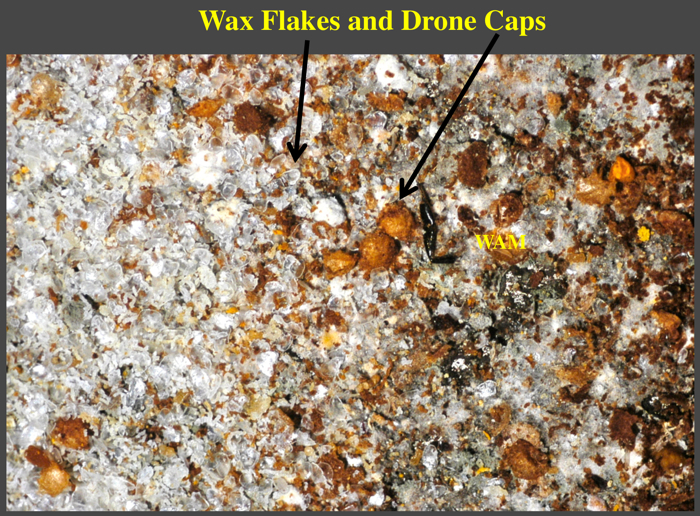
When the bees build comb, they secrete small wax scales or flakes from glands on their abdomens. Then the bees manipulate the scales, forming them into comb. During that process, the bees drop some of the scales and they accumulate on the sticky board. This layer of wax scales forms a kind of “shadow” under the part of the colony actively engaged in comb building. If the colony is a newly hived swarm or a just installed package bee colony, a large wax scale shadow forms under the cluster. This shadow also tells where in the hive the colony resides and gives an estimate of the colony size without opening the hive. The photograph below shows a close up of a wax scale shadow.
The wax scales or flakes appear white or almost clear. Also in the photograph above are caps from drone brood cells.
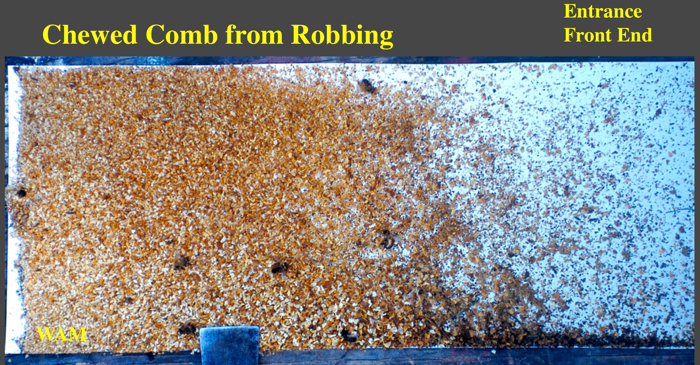
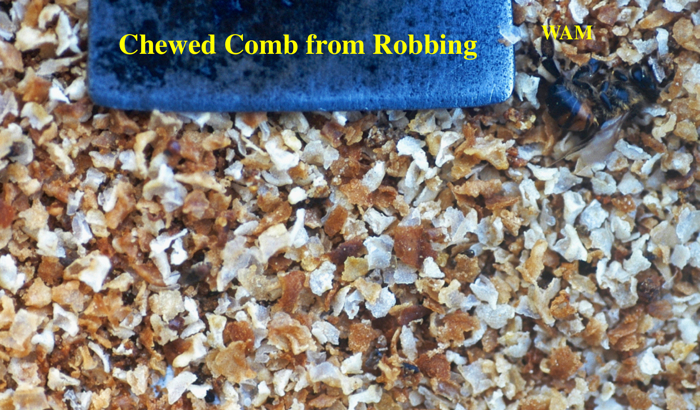
In the summer during a dearth, weak colonies can get robbed by strong colonies, a situation that beekeepers should avoid with routine colony inspections to make sure colonies can cover their combs and guard their entrances (see the extensive management chapter in my book Chapter). Bees in a robbing frenzy chew the comb as they remove the honey. For top-bar hive combs, this chewing is particularly destructive. The bees can chew away the upper part of the comb, which held the honey, to the point that the comb breaks or is too weak to use. This comb chewing is more of a problem with top-bar combs than with combs in frames. With a frame the comb has the support of the surrounding frame and comb breakage after robbing is usually not a problem. Not so with top-bar hives, which add even more weight to the rule: Do not let the bees rob. On a sticky board, bits of the chewed combs pile up, indicating a bad problem upon removing the sticky board as seen below.
Most of the chewed comb bits are to the left, in the back of the hive where the bees stored the honey. This much chewed comb, spread across the sticky board, usually indicates the colony has perished and other bees have robbed out the remaining honey. Be careful with the reasoning here. Some cause or causes made the colony weak (or it died), and then the robber bees came in and removed the honey. I look through the hive and try to figure out why the colony perished. Sometimes I can find the cause; other times I am left with suspicions. The important point is not to jump to a conclusion – a weakness in reasoning and a good way to get it wrong. I show a close up of the size of the chewed comb size in the trash identification section below.
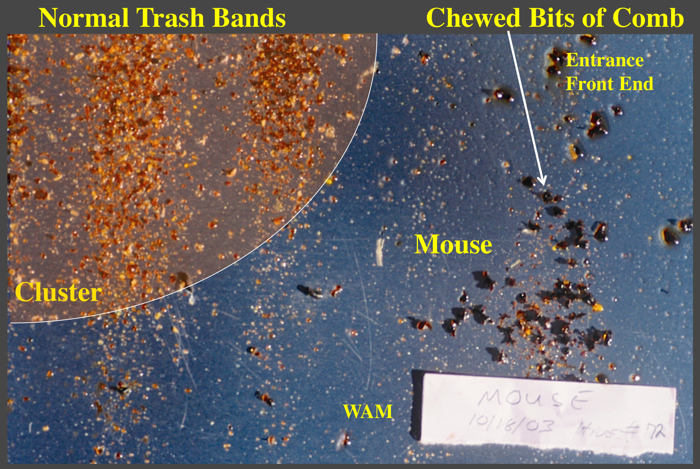
When the weather turns cold, the bees cluster, leaving much of their comb unprotected. Mice can enter the hive and feed on the pollen and honey. Sometimes mice even build a winter nest in the hive and destroy a considerable amount of comb. The standard practice is to put mouse guards on the hive entrances to keep these pests out of hives (see the book for mine). The following situation showed me how mice begin visiting the hives just as the weather starts turning cool. The practical implication was that mouse guards should go on the hive right when the nights get cold and the bees cluster. This time is in very early fall when the bees cluster only at night exposing their comb. During the afternoons, the days are warm, the cluster breaks, and the colony reoccupies most of the comb while the bees forage. Below is a sticky board I pulled on October 18, 2003 from Hive number 72. (Others were similar.) The entrance is to the right and combs were over the entire sticky board.
To the upper left are trash bands from a cluster, which do not extend completely across the sticky board. That indicates the cluster has shifted to one side of the hive. At night the cluster contracts over that part of the sticky board with the trash bands. Overall this region has the most bee activity. I highlighted in red the area under the contacted cluster and marked its approximate boundary with a white semicircle. A mouse entered the hive from the right, well away from the cluster since the cold drove the guard bees to the warmth of the cluster. To the right just over the paper note are fairly large dark bits of comb. In the combs above, the mouse gnawed the unprotected combs. See how the mouse would be well away from the cluster as shown by the semicircle boundary. Imagine now, combs (without bees) are between the mouse chewing the comb and the cluster. The cold and the intervening combs protect the mouse since the bees stay in the cluster. The comb damage was very minor, indicated by the chewed bits on the sticky board (and on the screen floor). The bees easily repaired the damage on the warm afternoons. Without the chewed-comb evidence on the sticky board, I may never have known mice were visiting the hives so early in the fall. (Another technical point: The sizes of the mouse-chewed pieces of comb on the sticky board were the same as the ones the right side of Figure 5.11 on page 132 of the book. That reference photograph shows a ruler with different bits of trash because the size of the bits can indicate what made it. For example, a mouse bites off a much larger piece than a bee uncapping comb.)
Abnormal Trash Patterns on Sticky Boards
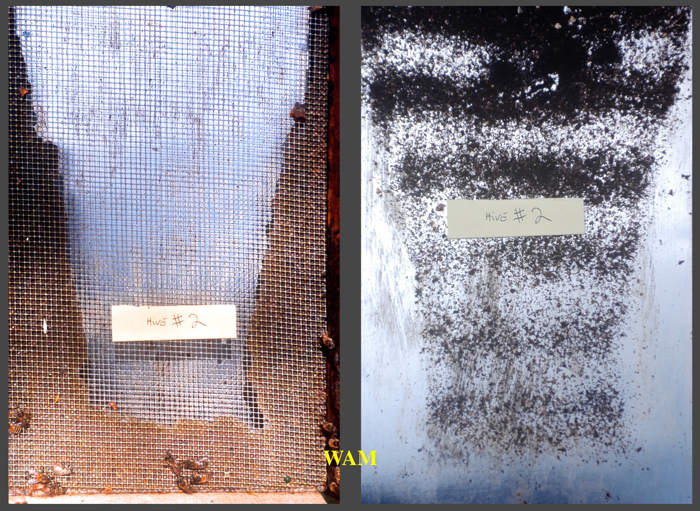
Anything blocking the screen will show as a clear place in the trash pattern on the sticky board. The most common blockage is propolis (bee glue) in the screen as shown below.
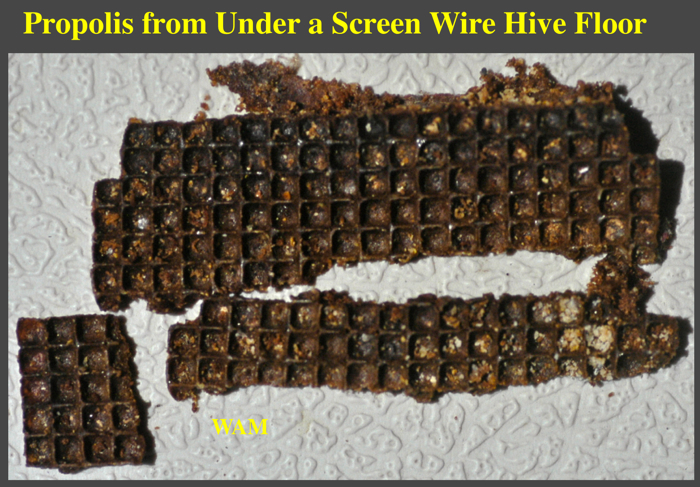
On the left is a screen floor top-bar hive seen from above. The bees are depositing propolis starting from the sides of the floor (and back of the hive) and working inward. On the right is the matching trash pattern on the sticky board showing the clear edges, which are under the propolized screen. Bees typically propolize a screen from the sides and go inward. Watch for clear edges on the sticky boards. That could be where the propolis is starting on the edges of the screen. Cleaning propolis from the screen is not too difficult. I show how to do it in my book using simple tools. Briefly, the bees push the propolis through the screen. In the upper left picture, see the screen with the propolis pushed below. That makes the cleaning job much easier. I just scrape it off the screen. The picture below shows propolis scraped off a screen still bearing the print of the screen.
As I explain in the book, odd reappearing clear places on the sticky board indicate some kind of blockage above. On page 226 Figure 5.78, I showed a strange circle of propolis in the screen floor of a hive. It was just so weird – why did the bees do that? – a propolis ring in a screen floor hive. At first I did not know it was in the hive. When I started checking the sticky board of that hive one summer, I saw a faint circle in the trash. At first I did believe it but it kept reappearing. The picture below shows what I saw.
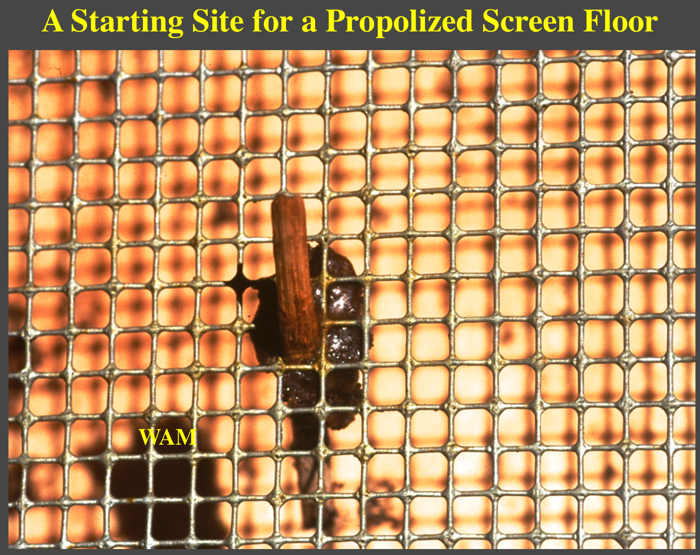
I do not know how such a strange circle got started. However, a propolized screen can start from something in the wire. Below is a close up photograph of a small stick caught in a mesh hole of a screen floor.
Bees, by their nature, connected the stick and wire with propolis. That began a propolis work site. See how the bees have just started to fill in the mesh holes of the screen, moving away from the stick. The propensity for bees to collect propolis, and consequently to fill in the screen, depends on their genetics and on the location of the work site. I have had colonies block up a screen in two seasons, thankfully a rare occurrence though. Most colonies propolize the screens fairly slowly. My advice is not to let any fallen objects stay on the screen, for example pieces of wax from cutting comb attachments. The bees might attach some of that wax to the wire and start propolizing the screen from that little place.
Identification of Trash on Sticky Boards of Screen Floor Top-Bar Hives
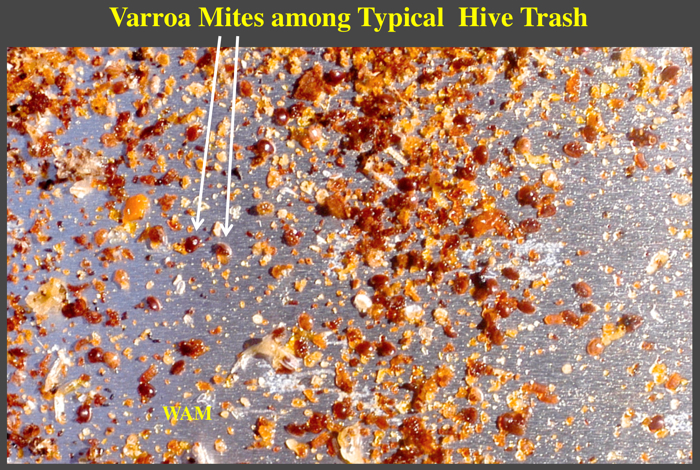
Knowing how to identify the trash on sticky board is very important. Below is a list of things I have found. Of course first on the list should be varroa mites. There are plenty of varroa mite pictures. Below is a picture of dead varroa mites as they appear in the trash on my sticky board without vegetable oil to trap the live ones.
Although this picture is not from a varroa count (no oil), one can see that too much trash makes counting difficult. Still see how many mites you can count in the picture above. Understand that depending on your screen size you might be seeing the mites larger (big screen) or smaller (mobile device) than reality. A varroa mite is about the size of a pin head. I can count mites with this much trash on the sticky board. I avoid it though. Counting is slower and much more tedious than usual. After three days of accumulated trash, usually too much is on the sticky board for counting varroa.
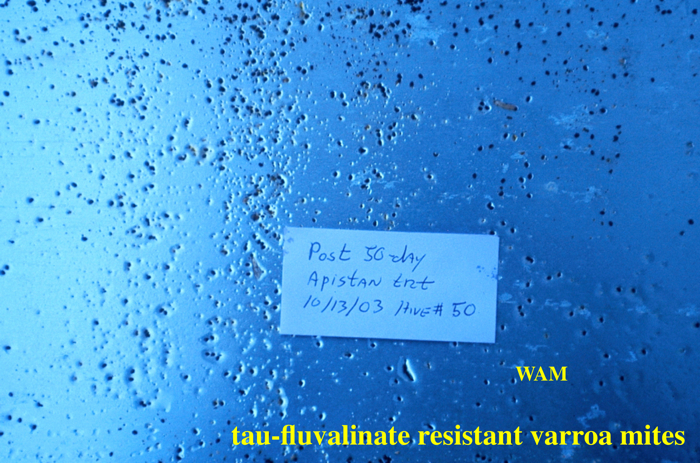
Below are varroa mites, the larger specks, from my study of miticide-resistant mites back in 2003. The mites are trapped in the vegetable oil. Hardly any trash appears on the board helping to make the mite counting go quicker. You can see there were plenty of mites to count. However, that was a small part of the colony’s total varroa population. You are seeing the ones for that counting day. I counted mites every couple of days from August to October as the miticide eliminated the populations in about 40-50 hives or about 100,000 mites per season. That went on for four years, totaling over 400,000 mites. Collecting data can be a real hardship. But that is what it takes to get Fig 5.74 in the book, a figure showing why miticide-resistance varroa makes beekeeping so complicated – and most important for the quality of the book – not resorting to made-up speculation. (That figure alone came from counting 110,372 varroa mites in 53 colonies in 2003.) The little note in the photograph below says these varroa were still in the hive after 50 days of Apistan treatment, that is, they are resistant to Apistan. I removed them with Checkmite+ because they were susceptible to that miticide. Repeating this experiment now would complicated because Checkmite+ resistant varroa have been reported. (This kind of double miticide treatment is absolutely not recommended for beekeepers. I used it for scientific research.)
Just for the record, I quit using chemical pesticides, that is miticides, years ago. That includes any other varroa interventions, not even removing drone brood or screen floors, to control varroa. (Most of my hives have wood floors.) Rather I rely on bee stocks that maintain low numbers of varroa in the colony. On several occasions I could not conduct a special experiment because my varroa populations were too low; that’s right, I did not have enough varroa. While that’s good for my beekeeping, as a research scientist who spends a lot of time in the apiaries observing numerous colonies, I suspect varroa is still a problem, its effects seem more cryptic now. So I am building a new batch of screen floor top-bar hives mostly 4 feet long with larger colonies (than the 2 foot hives). The 4 footers are like the backyard top-bar hives used by a growing number of beekeepers. I will use these new screen-floor hives to study the numerous effects of varroa on bees and most importantly with information coming from top-bar hives. I am not sure how many of these hives I will build, since there is no funding for this research.
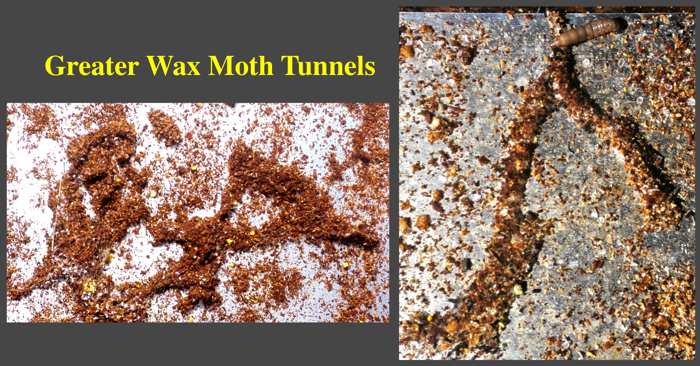
I frequently see wax moth tubes on the sticky boards, more so in the summer when I leave the boards in the hives without oil. Too many tunnels and webbing under the screens will attach the sticky boards in the hive, making them difficult to remove. Therefore keep the space clean under the screen. (Use the special scraper and the techniques described in the book to remove the cocoons.)
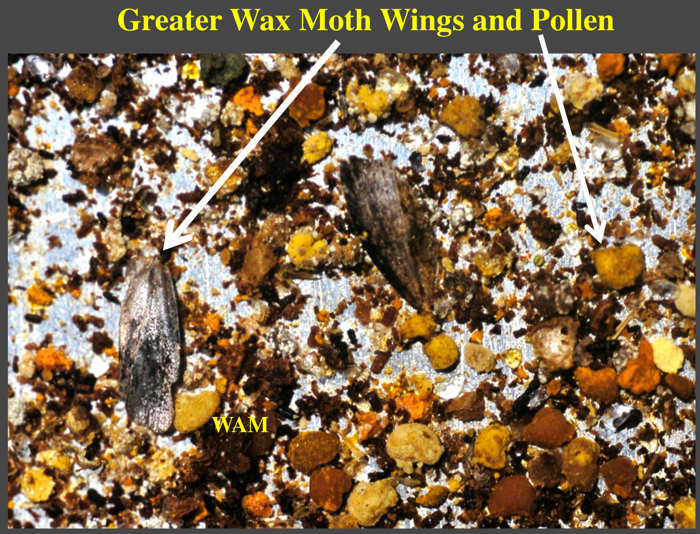
Tiny bits of trash cover wax moth tunnels. At the top of the right picture above is a wax moth larva, which came out of its tunnel. Among the trash, I have found wax moth wings as pointed out with the arrows below.
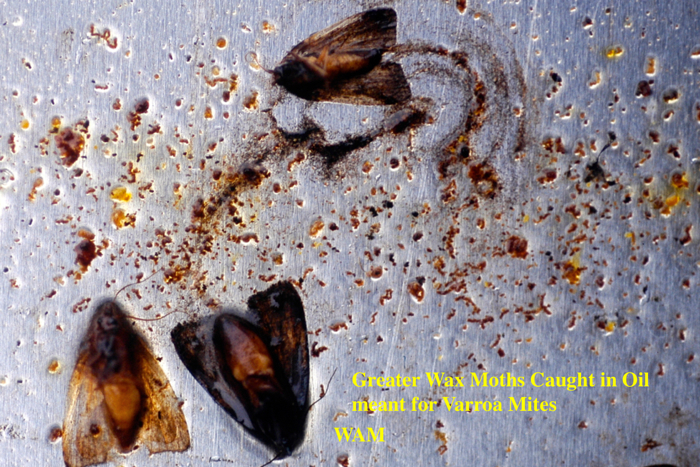
When I am running a varroa count with oil on the sticky boards, occasionally adult wax moths get stuck in the oil.
I picked this picture because to the right of the moth at the top of the photograph is a swirl mark in the oil. The swirl mark is from the moth’s wings pushing in the oil, as it tries to get free. I have seen swirl marks without the moths, something that is perplexing until you see the moths. The moths might be around the rear door to the sticky board or they might be pupating under the screens. Using a flashlight, look under the screen for the cocoons in the corners. (Use the special scraper and the techniques described in the book to remove the cocoons).
Sometime honey granulates in the comb. The pattern of granulated honey crystals on a sticky board was shown above from the bees removing the solid part of the honey from the comb. Below is a closer view of the crystals.
Chewed comb pieces from summer robbing was shown above as a “pattern” on a sticky board. Here is a close up of the pieces.
When robber bees chew a comb, they make pieces roughly between the other two, uncapping bees and comb gnawing mice. For scale, that is a standard hive tool (the kind with the end curved) and a dead bee at the top of the picture.
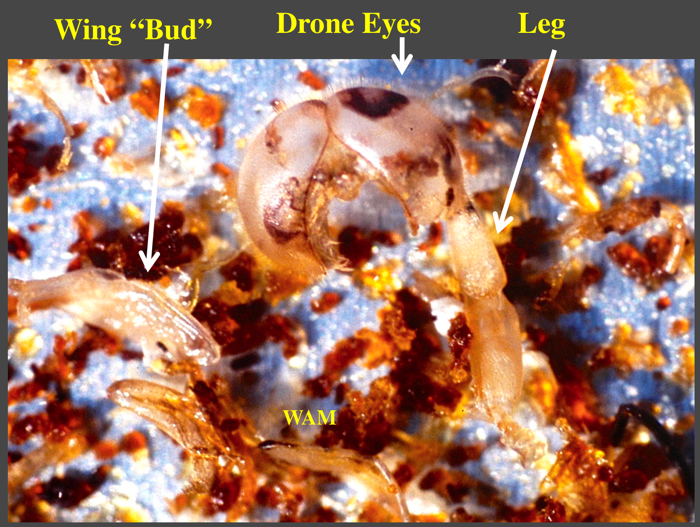
A magnifying glass comes in handy to see fine details in the discarded trash world on sticky boards. Picking through the trash, one comes across various little skins, exact external replicas, ghost-like see-through forms, disappearing in the slightest breeze, blown away. Below are pieces of molted skin from a drone. An undeveloped wing is on the left and a leg is on the right. The leg resembles a drone leg since it appears to lack a pollen basket. In the middle at the top of the picture is definitely the head of the drone. The hallmark feature of drone eyes, the two big compound eyes, is that they meet at the top of the head, as these do. (Queen and worker eyes do not touch.)
Look at where the eyes touch. See something appearing as a fine fuzz? That fine fuzz is “hair.” Yes, strange as it seems, bees have hairy eyes. You just never know what you will learn by looking through thrash on a sticky board.
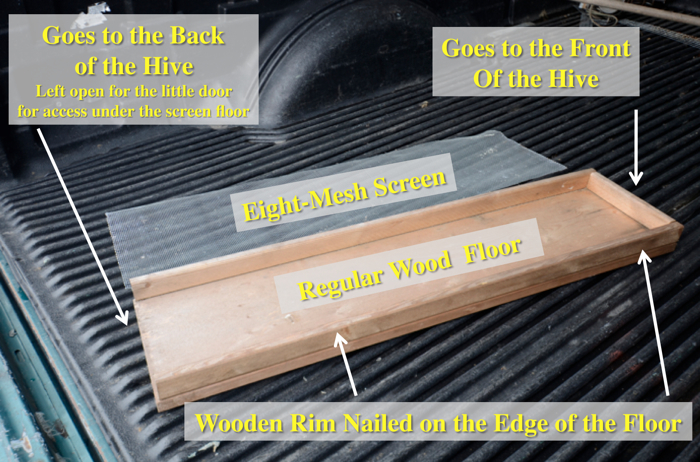
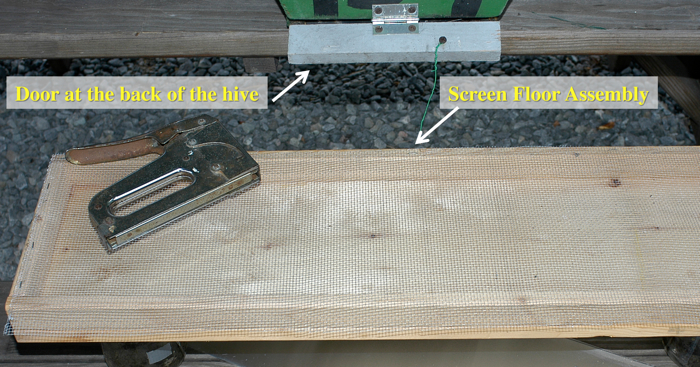
Recently, a beekeeper, who was building a hive, requested more pictures on making a screen floor (reference at page 30 in the Screen Floor section in Chapter 3, Building a Top-Bar Hive). So I made the picture below showing a regular wood floor with the rim nailed around the edge except at the end where the little door is located. The eight-mesh screen is next to the wood floor with the rim.
Below is a close up of a screen floor, similar to Figure 3.11 in the book. I am stapling the screen to the rim. The screen floor assembly, meaning the wood floor, rim, and screen (all assembled as a unit), mounts under the hive with the open end to the rear of the hive. The pictures above show how I use the doors to insert and withdraw the sticky boards.
While I hold the copyright on all the pictures and all other content on my website, I am letting beekeepers show these pictures directly from this web site at beekeeping meetings, regional or local club meetings for educational use.
To learn a complete system of beekeeping for top-bar hive beekeeping, please go back to the Welcome page to order the book.
I hope these pictures are instructive and beekeepers see new things. I plan to publish more pictures on this page. I am planning additional pages on other top-bar subjects too.
This screen floor top-bar hive page started out at about 6,000 words and 30 pictures. It takes a lot of time to accumulate the photographs and write these detailed pages. Please consider supporting this top-bar hive information with the donation button below. You do not need a Paypal account. Paypal just moves the funds and keeps everything secure. After clicking the Donate button, look to the lower left of the screen to the pictures of the little credit cards. Click the blue “continue” and places to put in credit card information will appear. Thank you.
Kind regards,
Wyatt A. Mangum, PhD
